Monthly Archives :

April 2019

Lets Talk About Parsley

Lets Talk About Parsley 450 450 windermere

Parsley

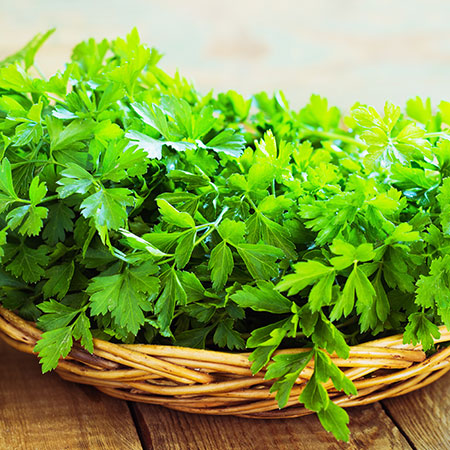
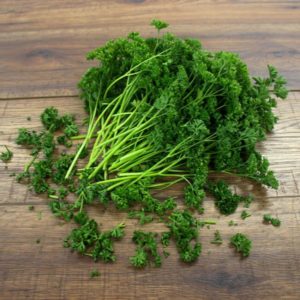
Native to the Central and Southern Mediterranean regions and a member of the Dill Family, parsley has been cultivated for more than 2000 years. Being used medicinally for many years before it was used as a culinary ingredient. There are two main types of parsley, curly leaf and flat-leaf Italian. Both have similar tastes and are both however the flat leaf is a bit stronger in flavor and is found to be easier to grow. The curly-leaf is often preferred for its pretty decorative appearance. The third type, hamburg root parsley is used more in the middle east and not seen much in the U.S. and Canada.

When planting parsley it is best if they are started indoors about six weeks before they can go into the garden. When transplanting into your garden, put them into a sunny spot and keep the soil damp during the season.

Although parsley was known to have a multitude of positive health benefits with many magical and unusual uses, throughout its history it was also known to have a dark side and was connected with death and the devil. Here are a few legends and myths I found about parsley that I thought were interesting.

• Parsley takes a long time to germinate, it used to be said that the reason for this is because it had to visit the devil nine times before the seeds sprouted.
• It was served with meat in order to calm the spirit of the animal
• It apparently grows best in the garden of where the female is more powerful than the male
• In Ancient Greece it was the herb which most symbolized death, it was thrown on graves of the dead
• According to old wives tales only the wicked can grow it

Over the years parsley became more and more appreciated for its medicinal values. It has Several B vitamins, Vitamin A & K, beta-carotene and contains more vitamin C then most citrus fruits. It is also full of magnesium, copper, iodine, iron, calcium and potassium. Parsley has enzymes that are antifungal and antibacterial and has been known to help boost the immune system. Here is a list of ailments it is known to help.

– Balances Hormones – Eye Health
– Treats Bad Breath – Eases Joint Pain
– Colds – Pain Relief
– Heart Health – Boosts Metabolism

This is just a small list of all the medicinal benefits parsley can be used for. So I guess we should be paying more attention to that green sprig that is placed on your plate as a pretty garnish.

Recipes using Parsley

Chinese Salad

Salad Ingredients

• 1 cup mushrooms, finely sliced
• 1 cup of bean sprouts
• Juice form ½ a lemon
• 3 stalks of celery, diced
• 2 cups of cooked rice (cooled)
• 1 green bell pepper, diced
• 1/3 cup of raisins (optional)
• 2 tbsp. of parsley, chopped
• ¼ green onions
• 1 cup of cashews

Dressing Ingredients

• ¼ cup of soy sauce
• ½ cup of oil
• 1 cup garlic clove, finely crushed

Directions

Salad – Sprinkle mushrooms with lemon juice and place in a large salad bowl. Add other ingredients and set aside.
Salad Dressing – combine all dressing ingredients in a small bowl and mix together.

Pour dressing over salad, toss and let marinate for one hour before serving.

This recipe is from a recipe book called “Barefoot in the Kitchen” that was put together by the Windermere Women’s Institute and can be purchased at both our locations for $20.00


More Recipes

Here are some links to a few more yummy recipes we have found using parsley.  We would like to know what your favorite recipes with fresh herbs are, find us on Facebook and share your recipes with us.


Pomegranate-Parsley Tabbouleh


https://www.bonappetit.com/recipe/pomegranate-parsley-tabbouleh


Green Goddess Mac & Cheese

https://www.simplyrecipes.com/recipes/green_goddess_mac_and_cheese/


Parsley Potatoes

https://www.tablespoon.com/recipes/parsley-potatoes/7c2d0a0e-1f79-4d0b-8bb4-28c38099545d

                 Happy Cooking!

Creeping Phlox

Creeping Phlox 330 200 windermere

Creeping Phlox (Phlox Subulata) Perennial Ground Cover, zone 4-8, Full Sun

Ground Phlox produces a deep green carpet needle like foliage that blooms in early spring. It’s small vibrant, five pointed, starry like flowers in shades of pink, white, lavender, red or blue and are known to be one of the most colourful options for a ground cover. This evergreen perennials will grow approximately 6 inches tall and will spread up to 2 feet wide.

Creeping Phlox is low-maintenance, hardy, deer resistant, and can grow in difficult areas. It is often used to cover up or camouflage unsightly sloped areas, rockeries or to brighten up rock walls, ledges, railings, and along walkways. It is also often used for bordering along flower beds.

After the first bloom had died off, shear back the stems, this will promote a second bloom. As the Creeping Phlox ages it will produce long spreading stems, which become woody. Over time these woody growths will not produce flowers, to encourage new growth that will bloom, the woody stems should be cut off. The plant will continue to grow and the foliage will stay lush and green over the rest on the summer season. It should be left till late fall, when it can be cut back for spring growth, this will allow for rejuvenation and will help to produce more compact stems.

Starting Seeds Indoors

Starting Seeds Indoors 375 500 windermere

Starting Seeds Indoors

Spring is officially here the snow is starting to melt (slowly), some of your perennials and shrubs should be showing signs of coming back to life and your spring bulbs will be poking through the soil soon, if they aren’t already. If you haven’t already stated your seeds inside, now is the time. Starting some seeds inside gains you a few extra weeks in our short growing season, which allows you to choose some of the vegetables that have a longer growing time.

In order to start seeds at home you will need the following;

• Seeds
• Clean containers or flats – egg cartons can be used as well
• Soil – We use BM8 soil which has a blend of high quality composted peat moss, that provides beneficial microorganisms to enhance plant growth (can be purchased at both locations)
• Labels – popsicle sticks work well for this
• Marker/pen
• Pencil or stick to poke holes in soil
• Water

Before the planting begins you will want to read all your seed packet instructions. Some seeds need to be chilled, soaked, scratched etc. before planting. Also keep in mind on the instructions for transplanting. Some seeds need to be transplanted into bigger containers as they grow and some seeds don’t like to be moved. It is important to plant according to what is instructed.

Now that you have prepped your seeds as instructed on their packages, they are ready to be planted.

• Fill your clean containers with moistened soil. Most seeds can be gently pressed into the soil, with your pencil or stick. However some seeds are to be covered, some not, some are to be planted with very little soil covering the seed and some might need to be buried ½ an inch in the soil. This is why reading your seed packages is important.

We suggest planting one kind of seed at a time and labeling the containers as you go. It can be quite frustrating trying to figure out what is what, when you are trying to transplant into bigger pots or when transferring your plants into your outside garden.

• Once your seeds are planted they will need watered, you want to be gentle with the watering. Using a spray bottle to mist the planted seeds works well, we have heard turkey basters also work well or a light flowing watering can. Using lukewarm water when watering is usually best as cold water can sometimes shock your seeds and they won’t germinate.

• Now that your seeds are planted and watered, cover the trays with plastic to keep them from drying out, making sure there is a few holes in the plastic to allow some ventilation.

• When your seeds start to sprout remove the plastic and move the trays into a spot that gets lots of sun. If you don’t have a sunny spot you can always set up a station with grow lights. Grow lights should be a few inches above the plants and should be moved up as the plants continue to grow. If you place your seedlings in the sun it is advised that you turn your trays/pots around in different directions. This helps keep your plants growing straight and not bending in the direction of the sun.

• For the seedlings that are to be transplanted into bigger pots, you will know they are ready once they have sprouted their second set of leaves. You can use yogurt container, Styrofoam cups or buy pots from your local hardware store or garden centre. Like before fill your pots with your moistened soil and put a small hole in the soil with your stick or pencil.

• Carefully break up the soil your seedlings are in so the roots can be easily freed. Always lift seedlings by the leaves not the stems when you are moving them. Carefully place them into the new pots planting them as deep as instructed on the seed package.

• Be sure to water them when you are finished transplanting them. Just like before using lukewarm water, misting from a spray bottle or a soft flowing container.

• After transplanting, keep seedlings out of direct sun for a few days, this helps them to become better established in their new pots.

• Now we wait until the weather is warm enough that we can plant our seedlings outside. Make sure to keep seedlings watered as they grow. It is always best to keep inside until after the full moon in June. This year the full moon in June this year is on June 17th

We know planting seeds indoor takes some time, patience, a lot of space in your home and doesn’t always have the results that you had planned for. It is definitely a learning experience and can be mastered quite well over the years of trial and error. If by chance this isn’t your best year for indoor planting or if you’re like me and just don’t have all that much space in your home, for all the seeds you would like to start now. Don’t Fret! We’ve got you covered. We started planting seeds last month in our green house. With our horticultural experts doing the planting, we will have a huge selection of plants (including vegetables) for you to purchase to plant in your gardens, planters, hanging baskets and window boxes this year.